Yo!
Bin fertig geworden mit dem guten Stück, und dachte mir, ich hau euch mal ein kleines Tutorial hin. Deutsch/English.
Bittesehr!
Yosh! Finished Cloud's tonfa finally and came up with the idea for a little tutorial (English/Deutsch).
Here you go!
~ inspired by Cayra's Tutorial (German) @Animexx
Zutaten --- Ingredients :)
1 runder Holzstab/Besenstiel (20mm Durchmesser) --- 1 roundly wooden bar/broomstick (20 mm diameter)
1 Bastelwinkel aus Metall (kleinstmögliche Größe) --- 1 metal bracket (as little as possible)
1 Stück Schaumstoffrohrisolierung (22 mm Durchmesser) --- 1 piece of foam rubber insulation (22mm diameter)
2 kleine Schrauben --- 2 little screws
Holzleim --- wood glue
lufthärtende Modelliermasse (efaplast light) --- air drying modelling clay (efaplast light)
Acrylfarbe in mittelbraun und schwarz --- acrylic paint / brown and black
Lösemittelfreier Klarlack --- solvent-free varnish
Werkzeuge --- Tools
Säge --- saw
Bohrer oder Dremel ---- borer or dremel
Handschleifmaschine/Raspel/Schleifpapier --- sander/rasp/sand paper
Akkuschrauber --- cordless screwdriver
Cutter --- cutter
Pinsel --- paint brush

Hier mal das, was man für Schritt 1 so benötigt.
Und los gehts:
Erstmal braucht ihr die Maße des Tonfas. Ich habe als Vorlage das Mini-Tonfa von meiner Cloud-Figur benutzt und ausgerechnet, wie lang ein großes sein müsste. Generell sind Tonfa zwischen 50-60 cm lang.
Meines ist 55 cm lang, das Seitenstück etwa 15 cm (muss etwas länger gemessen werden, da es in den langen Teil gesteckt wird).
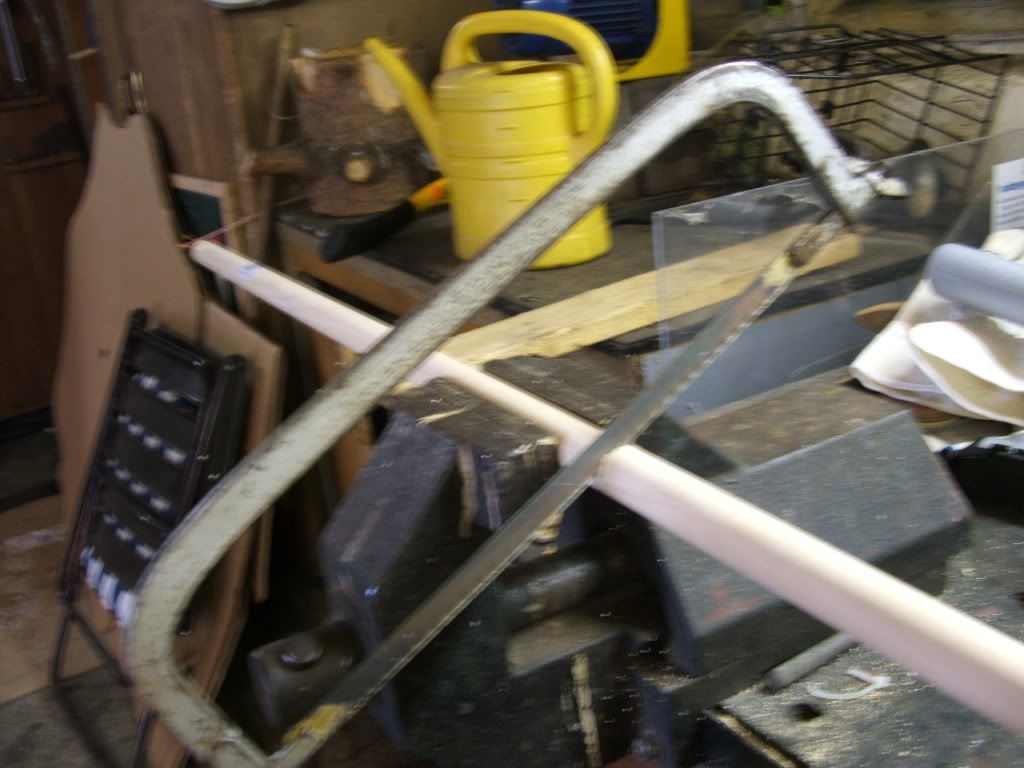
Den Holzstab sägt ihr auf die richtige Länge, die Isolierung wird mit dem Cutter in Form gebracht.
Here a pic of what you'll need to get started.
Okay.. here we go. First you need the measures of the tonfa. (I used the little one from my Cloud figure as an example and calculated.) Usually tonfas are 50-60 cm long. Mine is 55 cm long. The short part is around 15 cm long (mind to cut it a little longer, because you'll have to stick it into the longer part.)
Use the saw for the broomstick and a cutter for the insulation to get them to the right length.

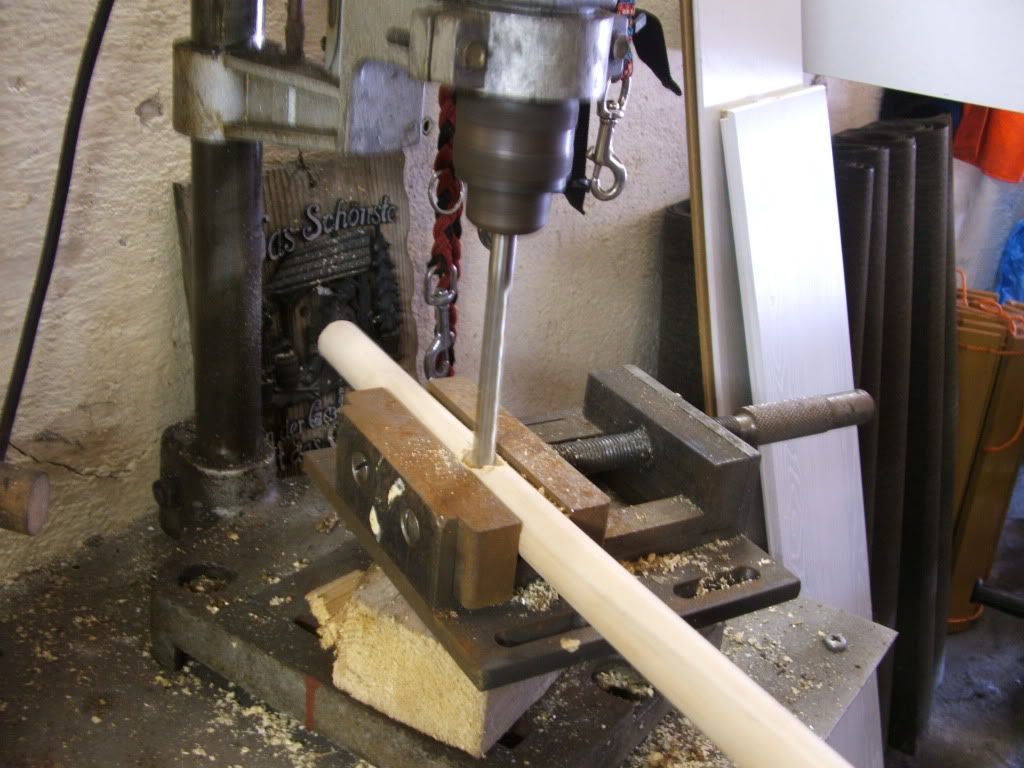
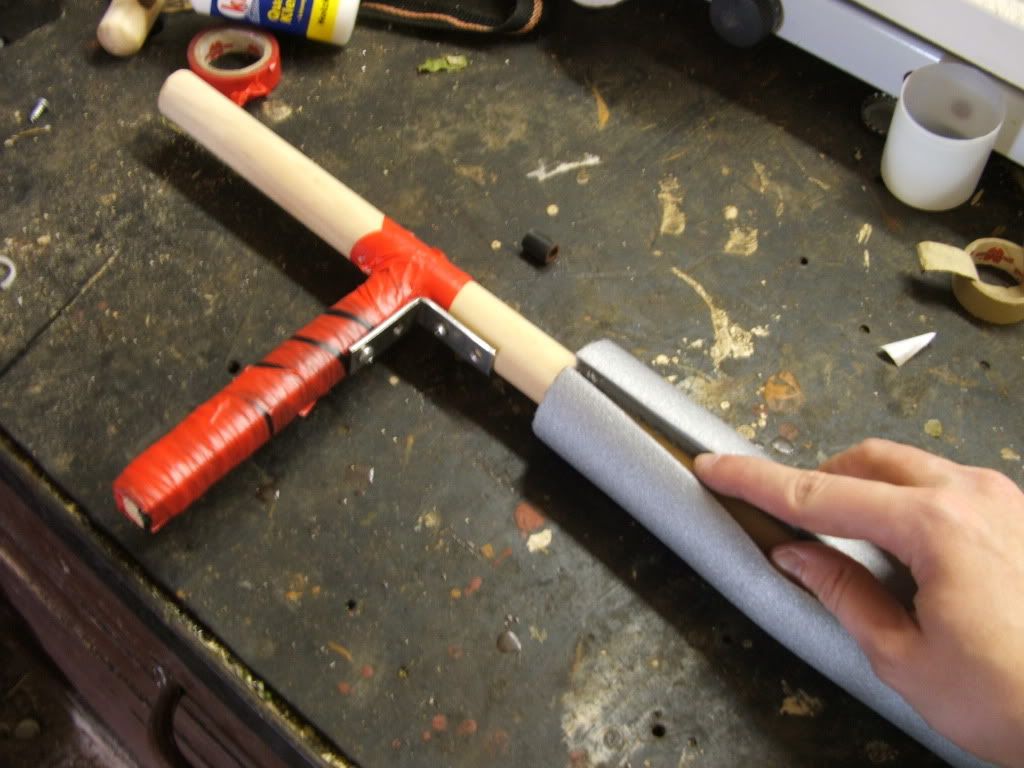
Das Seitenteil muss mindestens 15 cm entfernt vom oberen Ende des langen Teils angebracht werden. Markiert euch die Stelle und fräst dann mit dem Bohrer oder dem Dremel (ich hab leider nur nen Bohrer) eine Einbuchtung (1,5 cm Durchmesser) in den Stab. Der kürzere Teil muss an einem Ende so abgeschliffen werden, dass er dünner wird und in diese Einbuchtung passt.
The handle has to be placed at least 15 cm below the upper edge of the long part. Mark the exact place with a pen and then mill a notch into the broomstick. The handle has to be grinded on one end to fit in the before milled notch.


Das is ne Scheißarbeit und dauert recht lange. Es gibt sicher auch Möglichkeiten, das schneller hinzukriegen, aber ich hatte keine anderen Werkzeuge zur Verfügung. ^^°
Wenn ihr mit dem Abschleifen und Fräsen fertig seid, gebt auf das "ausgedünnte" Ende des Griffteils etwas Holzleim und steckt dieses dann in den Hauptteil. Festdrücken und trocknen lassen... oder schummeln, so wie ich und mit Tape befestigen.
Danach kommt zur Stabilisierung der Winkel zum Einsatz. Diesen einfach mit 2 Schrauben mithilfe des Akkuschraubers anbringen.
Hält bombenfest. :D
The grinding is a hard work to do and it took me quite a long time. Maybe you'll find better options to manage this, but I only had the said tools to work with.
When you're done, put wooden glue on the narrowed end of the handle and stick it into the notch. You can wait until it's dryed now, or cheat a little... like I did using tape. After that attach the bracket to the tonfa using the screwdriver. 2 screws should be enough. Bombproof, I say :D

Danach wird das Tonfarohteil mit der Rohrisolierung überzogen. Damit man am Griffteil vorbeikommt, die Isolierung einfach am oberen Teil etwas an der "Naht" auftrennen. Der Holzstiel wird dabei schön mit Leim eingekleistert. (Hielte zwar auch ohne, aber sicher ist sicher...)
Now you cover the wooden tonfa with the insulation. To get it over the handle, cut a little part of the insulation at its fissure. The broomstick you can cover with some of the wood glue, but it isn't neccessary.

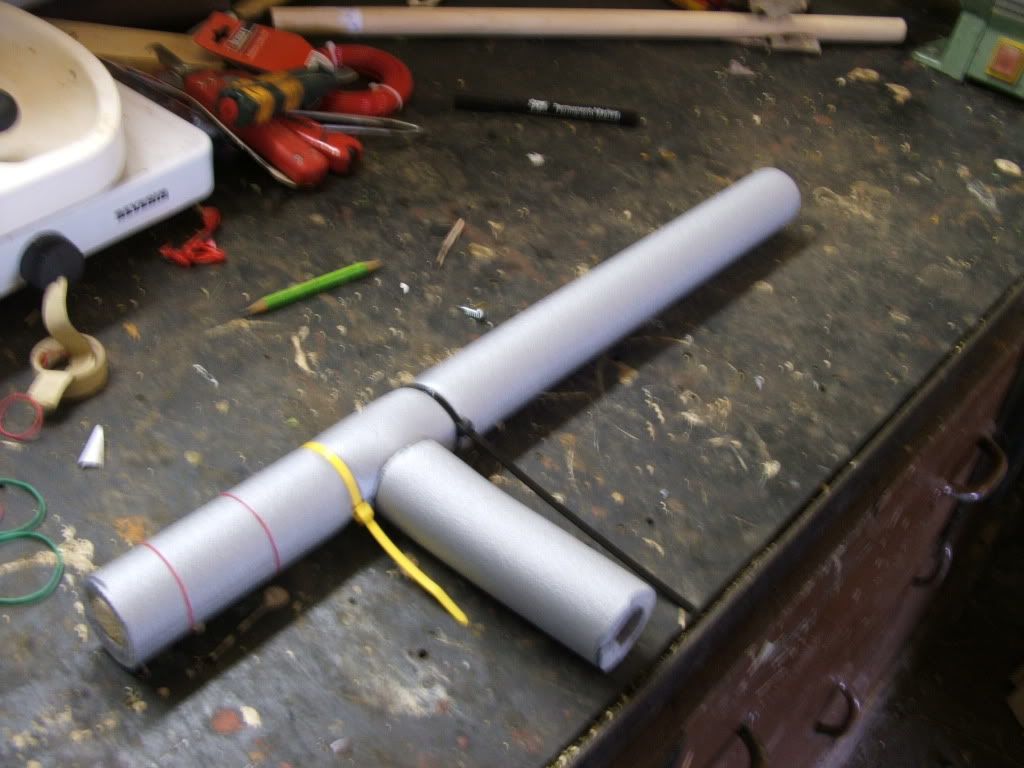
Ich habe die durch den Winkel etwas offenstehende Naht der Isolierung mit Leim zugeklebt und dann trocknen lassen. Das Ganze hab ich mit Kabelbindern fixiert, damits beim Trocknen nicht auseinander geht. (ACHTUNG: Hinterlässt Abdrücke)
There will be a little open part in the insulation because of the bracket. I used glue again to fix this and also cable binders. (BEWARE: will leave imprints)

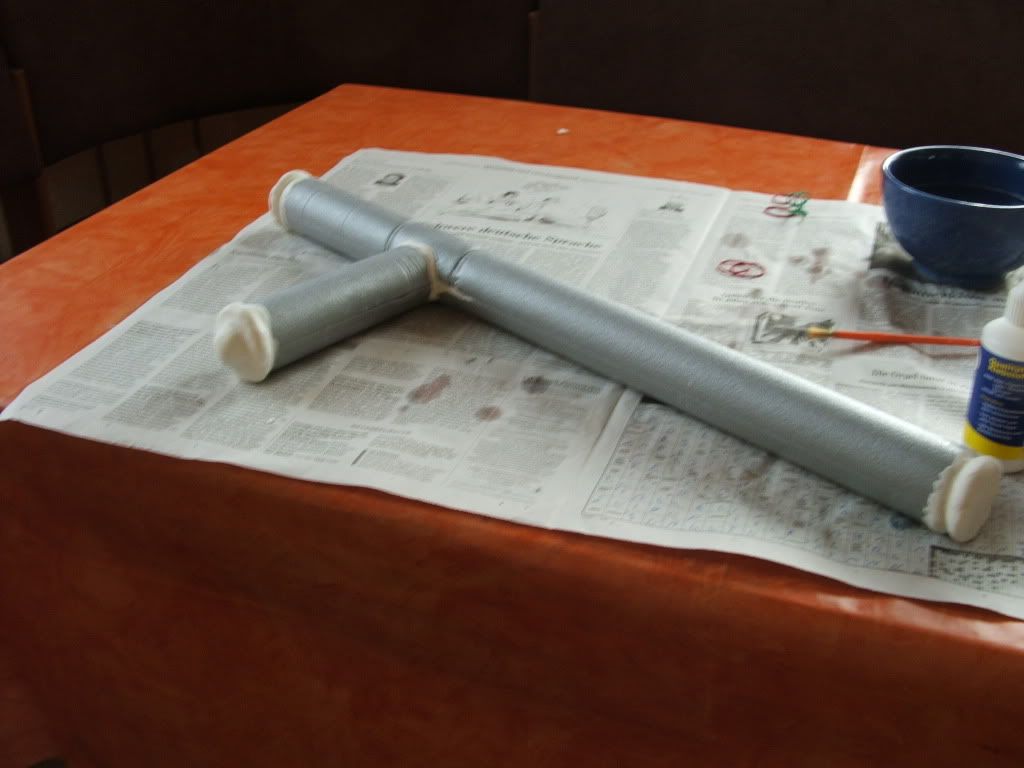
Clouds Tonfa hat natürlich noch Abschlüsse, diese habe ich mit Modelliermasse geformt und dann 48 Stunden durchtrocknen lassen.
(Die Kabelbinderabdrücke habe ich so auch wegbekommen, inklusive ein paar Öffnungen in der Isolierung, die der Kleber nicht zusammengehalten hat)
Cloud's tonfa has completions I formed them with the modelling clay and let it dry for 48 hours. I also fixed the imprints of the cable binders and some open parts in the insulation, which weren't closed by the glue.

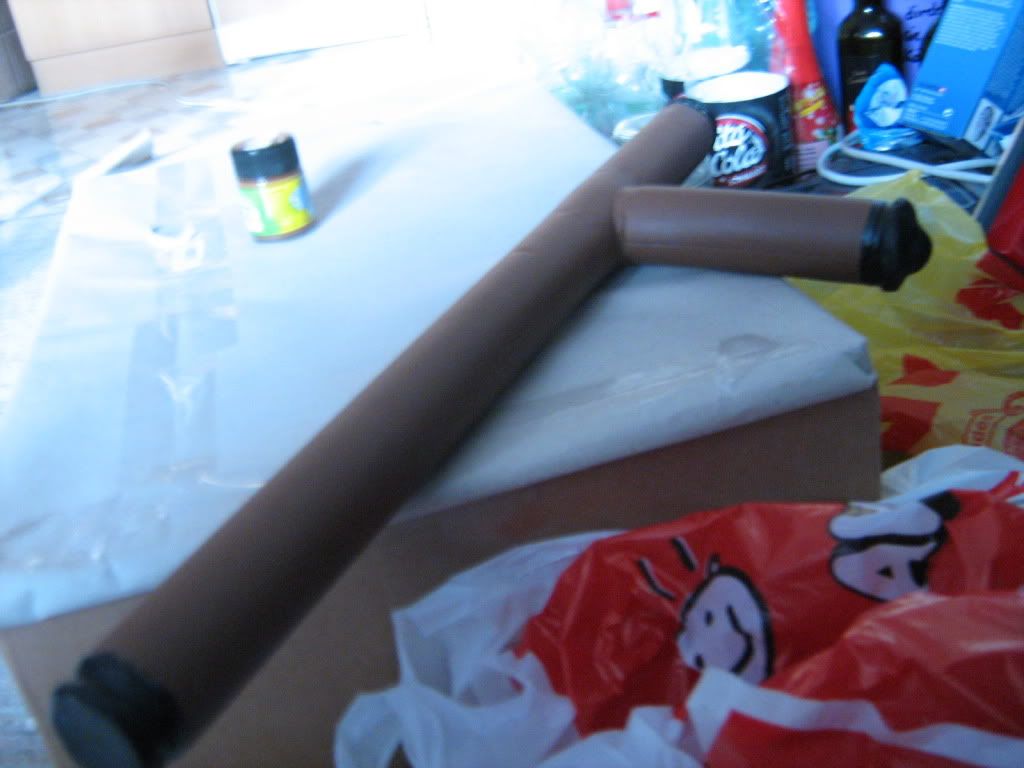
Eventuell entstehende Huckel könnt ihr dann mit der Feile und Sandpapier abschleifen. Zum Schluss bemalt ihr es einfach mit Acrylfarbe in Braun und Schwarz (mindestens 2 Schichten). Als Finish kommt ein Lösemittelfreier Klarlack drüber. Fertig!
Tadaaa!
You'll possibly have to deal with some bumps in the modelling clay. Use sand paper and rasp to get them away and finally paint the tonfa with acrylic paint in brown and black (at least two layers). As a finish use some solvent-free varnish.
Tadaaa!

Danke für's Lesen. Ich hoffe, es hilft euch. ^^
Thanks for reading, I hope it's helpful. ^^
Bin fertig geworden mit dem guten Stück, und dachte mir, ich hau euch mal ein kleines Tutorial hin. Deutsch/English.
Bittesehr!
Yosh! Finished Cloud's tonfa finally and came up with the idea for a little tutorial (English/Deutsch).
Here you go!
~ inspired by Cayra's Tutorial (German) @Animexx
Zutaten --- Ingredients :)
1 runder Holzstab/Besenstiel (20mm Durchmesser) --- 1 roundly wooden bar/broomstick (20 mm diameter)
1 Bastelwinkel aus Metall (kleinstmögliche Größe) --- 1 metal bracket (as little as possible)
1 Stück Schaumstoffrohrisolierung (22 mm Durchmesser) --- 1 piece of foam rubber insulation (22mm diameter)
2 kleine Schrauben --- 2 little screws
Holzleim --- wood glue
lufthärtende Modelliermasse (efaplast light) --- air drying modelling clay (efaplast light)
Acrylfarbe in mittelbraun und schwarz --- acrylic paint / brown and black
Lösemittelfreier Klarlack --- solvent-free varnish
Werkzeuge --- Tools
Säge --- saw
Bohrer oder Dremel ---- borer or dremel
Handschleifmaschine/Raspel/Schleifpapier --- sander/rasp/sand paper
Akkuschrauber --- cordless screwdriver
Cutter --- cutter
Pinsel --- paint brush
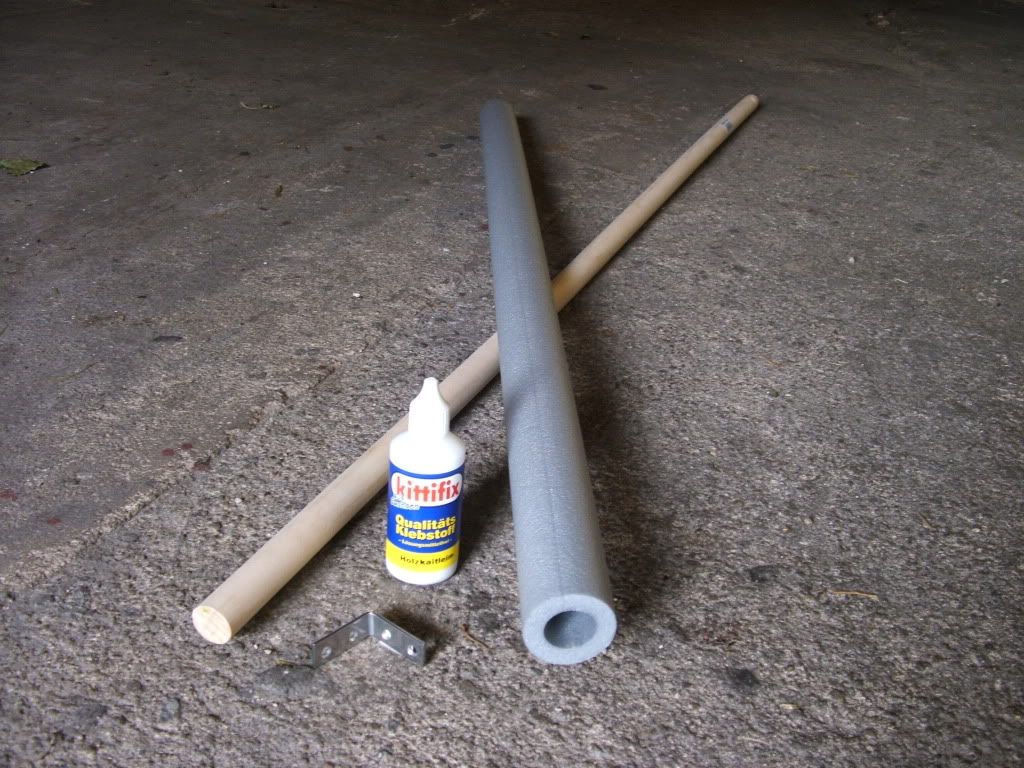
Hier mal das, was man für Schritt 1 so benötigt.
Und los gehts:
Erstmal braucht ihr die Maße des Tonfas. Ich habe als Vorlage das Mini-Tonfa von meiner Cloud-Figur benutzt und ausgerechnet, wie lang ein großes sein müsste. Generell sind Tonfa zwischen 50-60 cm lang.
Meines ist 55 cm lang, das Seitenstück etwa 15 cm (muss etwas länger gemessen werden, da es in den langen Teil gesteckt wird).
Den Holzstab sägt ihr auf die richtige Länge, die Isolierung wird mit dem Cutter in Form gebracht.
Here a pic of what you'll need to get started.
Okay.. here we go. First you need the measures of the tonfa. (I used the little one from my Cloud figure as an example and calculated.) Usually tonfas are 50-60 cm long. Mine is 55 cm long. The short part is around 15 cm long (mind to cut it a little longer, because you'll have to stick it into the longer part.)
Use the saw for the broomstick and a cutter for the insulation to get them to the right length.
Das Seitenteil muss mindestens 15 cm entfernt vom oberen Ende des langen Teils angebracht werden. Markiert euch die Stelle und fräst dann mit dem Bohrer oder dem Dremel (ich hab leider nur nen Bohrer) eine Einbuchtung (1,5 cm Durchmesser) in den Stab. Der kürzere Teil muss an einem Ende so abgeschliffen werden, dass er dünner wird und in diese Einbuchtung passt.
The handle has to be placed at least 15 cm below the upper edge of the long part. Mark the exact place with a pen and then mill a notch into the broomstick. The handle has to be grinded on one end to fit in the before milled notch.
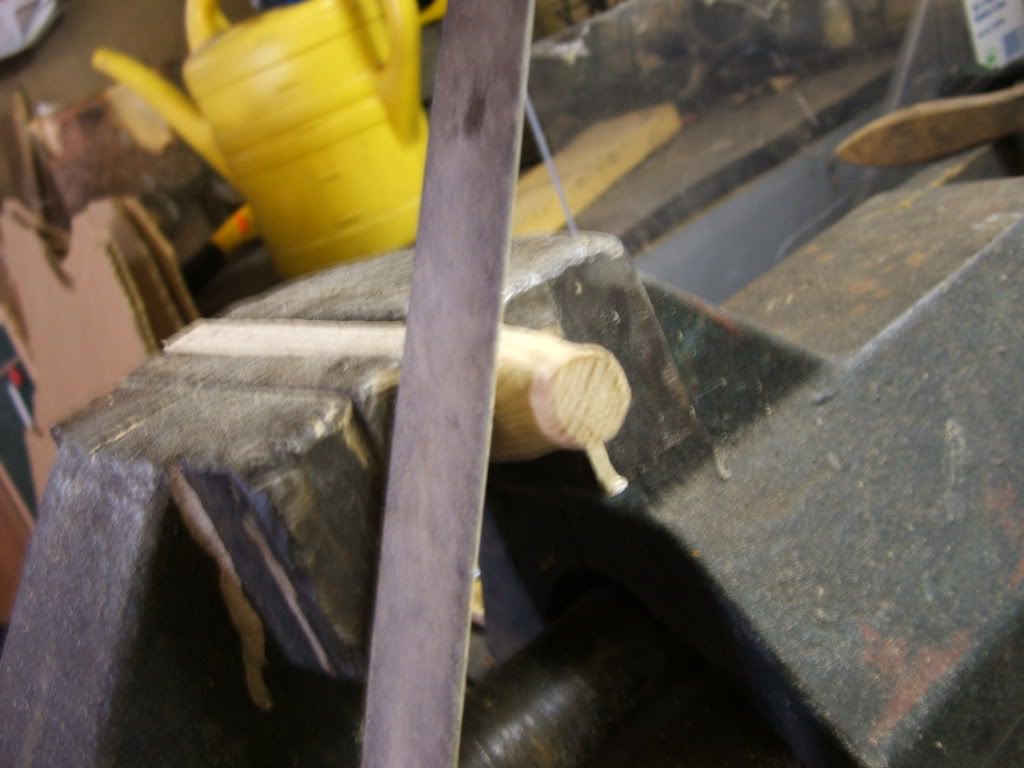
Das is ne Scheißarbeit und dauert recht lange. Es gibt sicher auch Möglichkeiten, das schneller hinzukriegen, aber ich hatte keine anderen Werkzeuge zur Verfügung. ^^°
Wenn ihr mit dem Abschleifen und Fräsen fertig seid, gebt auf das "ausgedünnte" Ende des Griffteils etwas Holzleim und steckt dieses dann in den Hauptteil. Festdrücken und trocknen lassen... oder schummeln, so wie ich und mit Tape befestigen.
Danach kommt zur Stabilisierung der Winkel zum Einsatz. Diesen einfach mit 2 Schrauben mithilfe des Akkuschraubers anbringen.
Hält bombenfest. :D
The grinding is a hard work to do and it took me quite a long time. Maybe you'll find better options to manage this, but I only had the said tools to work with.
When you're done, put wooden glue on the narrowed end of the handle and stick it into the notch. You can wait until it's dryed now, or cheat a little... like I did using tape. After that attach the bracket to the tonfa using the screwdriver. 2 screws should be enough. Bombproof, I say :D

Danach wird das Tonfarohteil mit der Rohrisolierung überzogen. Damit man am Griffteil vorbeikommt, die Isolierung einfach am oberen Teil etwas an der "Naht" auftrennen. Der Holzstiel wird dabei schön mit Leim eingekleistert. (Hielte zwar auch ohne, aber sicher ist sicher...)
Now you cover the wooden tonfa with the insulation. To get it over the handle, cut a little part of the insulation at its fissure. The broomstick you can cover with some of the wood glue, but it isn't neccessary.
Ich habe die durch den Winkel etwas offenstehende Naht der Isolierung mit Leim zugeklebt und dann trocknen lassen. Das Ganze hab ich mit Kabelbindern fixiert, damits beim Trocknen nicht auseinander geht. (ACHTUNG: Hinterlässt Abdrücke)
There will be a little open part in the insulation because of the bracket. I used glue again to fix this and also cable binders. (BEWARE: will leave imprints)
Clouds Tonfa hat natürlich noch Abschlüsse, diese habe ich mit Modelliermasse geformt und dann 48 Stunden durchtrocknen lassen.
(Die Kabelbinderabdrücke habe ich so auch wegbekommen, inklusive ein paar Öffnungen in der Isolierung, die der Kleber nicht zusammengehalten hat)
Cloud's tonfa has completions I formed them with the modelling clay and let it dry for 48 hours. I also fixed the imprints of the cable binders and some open parts in the insulation, which weren't closed by the glue.
Eventuell entstehende Huckel könnt ihr dann mit der Feile und Sandpapier abschleifen. Zum Schluss bemalt ihr es einfach mit Acrylfarbe in Braun und Schwarz (mindestens 2 Schichten). Als Finish kommt ein Lösemittelfreier Klarlack drüber. Fertig!
Tadaaa!
You'll possibly have to deal with some bumps in the modelling clay. Use sand paper and rasp to get them away and finally paint the tonfa with acrylic paint in brown and black (at least two layers). As a finish use some solvent-free varnish.
Tadaaa!
Danke für's Lesen. Ich hoffe, es hilft euch. ^^
Thanks for reading, I hope it's helpful. ^^
no subject
Date: 2009-08-19 12:05 am (UTC)From:looking forward to see u in this COSTUME +=+
no subject
Date: 2009-08-19 12:40 pm (UTC)From:I hope all the rest will turn out as well as this little weapon. :D
no subject
Date: 2009-08-19 07:31 am (UTC)From:awww wie süss >D
ich freu mich dich zu sehen !!!
no subject
Date: 2009-08-19 12:41 pm (UTC)From:Und wenn Shigai wirklich kommt zur Connichi *bet* dann is sie Zack.~
Uh.. aber hattest du nich ma überlegt, Reno oder Genesis dazu zu machen? o.o
no subject
Date: 2009-08-19 12:23 pm (UTC)From:sieht übrigens sehr toll aus :3 ich hoffe du kommst auch sonst so gut voran ^^
no subject
Date: 2009-08-19 12:43 pm (UTC)From:Danke <3
Muss demnächst mal die Hose fertig machen.. weigerte mich bisher den RV einzunähen. Ich hasse Hosen >__<
Jeden Scheiß kann ich nähen, die blödesten Kragen und sonstwas, aber Hosen-RV uuuuh nein. XD
no subject
Date: 2009-08-19 08:55 pm (UTC)From:http://www.hobbyschneiderin.net/portal/showthread.php?t=12742
das nehme ich immer ^^ musst halt nur für männer dann anders denken XDD
no subject
Date: 2009-08-20 08:23 am (UTC)From:ohooo, sieht aber gut aus!!
Feder:
Date: 2009-08-20 12:25 pm (UTC)From: (Anonymous)Re: Feder:
Date: 2009-08-20 12:29 pm (UTC)From:Das is so kuhl.
Basteln macht Spaß. Ich mach des jetzt öfters. XD
Re: Feder:
Date: 2009-08-23 08:57 am (UTC)From: (Anonymous)no subject
Date: 2009-08-20 04:58 pm (UTC)From:schade, dass ich nicht cosplaye, sonst würd ich das ganze vllt sogar mal ausprobieren. trotzdem danke (XD) und mach weiter so & good luck! <3
no subject
Date: 2009-08-20 05:46 pm (UTC)From:Hehe.. aber falls du mal so ein Tonfa brauchst... und keins kaufen willst, weiße ja jetzt wie's geht.